Here I was, so proud of myself that I had been able to maintain my weight for the most part. My Dr. had even told me on a few occasions that she'd like to see me gain a few pounds. When do you ever hear that?! So to my horror, at my last appointment my Dr. looked at my weight gain and asked me, "What, did you eat the whole turkey on Thanksgiving?!" I had gained 10 pounds. 10 whole pounds since my visit 4 weeks prior. How does that happen? And no, I did not eat the whole turkey. I may have had an extra large serving of dessert, but really, that doesn't constitute 10 pounds worth. But even so, the Dr. wasn't worried about the weight gain. Apparently she is used to seeing this sort of trend with women who don't put on weight in the beginning, there is a spike in the second trimester. I was told, however, that it shouldn't be so dramatic for the next visit. Darn it, it's the holidays! The average person puts on 10 pounds for the holidays, and I've got an exception here right? Right?
24 weeks
Thursday, December 27, 2007
Monday, December 17, 2007
Is it hot in here, or is it just me?
Another thing rarely mentioned, or maybe just unspoken...hot flashes while sleeping. Anyone experience this? I mean, besides my menopausal aunts (heh heh). I go to bed freezing and wake up around 2 AM drenched in my own sweat. Blech. Ick. Add this to the insomnia, the uncomfortable sleeping positions, getting up to pee 3 times, and sleepy night-night is not my best friend anymore. And then I feel her kick and all is right in the world.
Friday, December 14, 2007
Be careful what you wish for
I can't remember a time when I didn't want to be pregnant, ever since I was a little girl. I told my mom this all the time--I wanted a baby. They got me a puppy, Ms. T, the cutest thing ever. But who took care of her? My mom of course. I'm not sure what I wanted more, the pregnancy belly or the doll like animated creature I can cuddle and hold. I used to stand in front of the mirror and push out my gut as much as I could and rub my belly. You'd think I would grow out of this stage, but I found myself doing this when we were trying to get pregnant, those very long 2 years. I imagined what I would look like with a big pregnant belly. Well, now I'm on the road to realization, so to speak! Holy belly, it's here and now I'm afraid at how big it's going to get.
I had my first stranger comment on my belly the other day. Finally went shopping for the first outfit to commemorate finding out our baby is a girl (see picture below). The lady ringing up the purchase asked when I was due. I was beaming, just excited that someone outside my circle noticed I was pregnant! I proudly announced, "April!" She looks at me and says, "Wow, you are really big. My daughter is due in March and she's not as big as you." Hmm, OK-- not quite the response I was looking for. I started to panic and obsessed with this to Dione for a good amount of time after the purchase.
22 weeks
Outfit
Monday, December 3, 2007
And the moment of truth...
She's perfect! Major sigh of relief here. We got to see a very detailed scan of all her organs, her brain, heart, bones--everything. The tech said she is very active and stubborn. Ha, well look who the parents are, duh. She was so active in fact, that there aren't really any glamour shots I can post to brag about. They are all fuzzy and distorted. I do have the money shot though, which I'm sure she'll be embarrassed about one day, that her mom showed her intimates on a blog for all the world to see. But she'll get over it!
Saturday, December 1, 2007
Thump
Rick felt the baby move this morning! I think. He could have just been going along with it after days and days of putting his hand on my tummy with no such luck. I swear that man has the thickest callouses on his hands, it's a wonder he feels anything. Anyway, I had some pretty big thumping going on and the baby was higher this morning, just under my belly button. I grabbed Rick's hand and I had a little dialogue with the baby on being a good little baby and please just kick hard for mommy, just this once because daddy thinks I'm making this stuff up. So like a good little baby, s/he cooperated. I even felt the kick with my hand over his hand! And the response...Tears of joy? Wide eyes of wonder and awe? Nope. Nothing. He said, "that was it? I thought it would be bigger." Oh well, we tried, the baby and I. I had a brief glimpse into the future when he comes home from work one day and I am jumping up and down because the baby rolled over and Rick says, "that's it? I thought s/he'd be walking by now."
Wednesday, November 28, 2007
20 weeks
Halfway there! I've got my appetite back, and it's come back with a vengeance. The other night I wolfed down dinner, amazed at the amount of time (or lack of) it took to clean my plate. I knew I had eaten pretty fast when Rick still had a good portion left on his plate. Like a gentleman, he didn't say anything...or did he even notice? After a ladylike belch, I looked at him and batted my eyes and said in my most seductive voice, "do you feel like getting frozen yogurt?" How could he resist my charm?
With the amount of eating that has increased, there's got to be some added fat coming soon. I feel like it's already started and am having second thoughts about the whole belly shot images I have posted. But I am going to keep my pact and keep on posting these shots, even if stretch marks start showing up. Remind me of this if clothing cover belly shots start to make their way onto the pages.
So the halfway point deserves some reflection. I forgot to add a conversation I had with my Dr. during my 1st trimester appointment. I was so excited to finally feel my uterus and I was convinced that the baby was towards the left side. I lovingly rubbed that spot as I talked to the baby. So at the appointment, my Dr. took out the Doppler to search for the heartbeat. With conviction, I told her the baby was over on the left, I even pointed out the spot. She looks at the spot, looks at me and says, "um, that's your colon. Your uterus pushes your colon out over there." Not only had I failed at figuring out my own anatomy, I had been lovingly rubbing and talking to my digestive tract.
Oh but what a long way I have come since then! I know where my stomach is now! It's pushed up towards my lungs. So now my lungs growl when I'm hungry! But the one thing I am sure of is where my uterus is and also where the baby is. The baby likes to kick on my right side (apparently likes to stay far away from all that digestive stuff going on), and the kicks and flutters are amazing.
20 weeks
Wednesday, November 21, 2007
Weight (of certain things)
Just finished a really quick read called Belly Laughs by Jenny McCarthy. You know who she is, the crass, beautiful woman who's dating Jim Carrey. It's along the same lines as the Girlfriend's Guide to Pregnancy, but crosses that line a lot more. Meaning that she really gets down to the dirty truth about pregnancy and the things ladies don't usually talk about. One thing in particular that cracked me up is that she measured her boobs. Apparently they got A LOT bigger and well, I thought that was a great idea. I attempted this yesterday. Why? Well, the girls have been getting bigger and heavier and I thought it would be a great idea to keep track, just in case one day I get some grief from my Dr. for gaining too much weight. I think weight gain from boobs is a great justification if I can back up the amount of weight, right? A few things to note if you try this at home:
- Heat up the scale somehow...maybe use a blowdryer to take the chill off...brrr!
- Don't use one of those fancy BMI digital scales, unless your boobs are so long they fit across the whole scale length. If that's the case, honey, you have more to worry about than the weight of those puppies!
- Bring the scale up to the counter height, don't attempt to lean over and dangle the girls on top. Pregnancy makes one dizzier than normal and the weight of the new belly throws one off balance.
Needless to say, I still don't know what they weigh, but Rick made a good point of using one of those kitchen food scales...I have yet to find out where that is or how much weight it holds but I'll keep you updated.
Wednesday, November 14, 2007
Maternity clothes
Although I haven't been able to fit into any of my form fitting pants since about 5 weeks pregnant, now my fat pants (oh come on, you know every girl has her fat pants) are being held up by a Bella Band. So the obvious next step is to go shopping for some of those cute (um, yeah right) maternity pants with the stretchy waist band. My attempts so far have left me more than a little frustrated. I'm sure some women put a little weight on in their butt and hip area, but seriously, do they have to make the pants so big in that area that it makes you look even more unflattering than you already feel? Maybe I'm still at the in-between stage of this, but I hope to god anything under my belly doesn't get as big as what the designers of these clothes have in mind. I have been able to find a few things that fit and a few things I know I'll grow into. It's just frustrating to try on 5 outfits just to go out and run errands.
18 weeks
Thursday, November 1, 2007
16 weeks
There really hasn't been a whole lot of changes to report up until the last few days or so. If anything, it seems like my body has started getting used to being pregnant and I'm not feeling that "pregnant" anymore. Some things I have noticed:
- My razor has never worked so hard in its life
- Silver dollar size has a whole new definition in my book
- Veins come in all different hues of red and purple
- Dessert any time of the day is a very good thing
Last night was Halloween and I got a special treat! I definitely felt the baby moving. I thought I had been feeling something here and there for the past few days, but really wasn't sure. Yesterday I felt a few taps and they got stronger at night, where there was no mistaking it for gas bubbles! I think it might have been after overdosing on Snickers and Nestle Crunch.
16 weeks
And just because I think the bump is a little more noticeable with clothes on, here's another shot.
Thursday, October 18, 2007
2nd trimester
They say you can start to relax when you enter the 2nd trimester. You start to feel your energy come back and feel more "normal." I have to say that this is a huge milestone for me but I wouldn't go as far as saying I am completely starting to relax. I am still cautiously optimistic, but definitely getting more excited as I start to feel things grow a bit more in the tummy area.
Rick and I were at a party last weekend and it was the first time that everyone was openly announcing the pregnancy. I am not one for the spotlight (ha, no comments from the peanut gallery...not one for the spotlight when I am sober, that is. Hehe), it makes me uncomfortable. I prefer to have the party so I am in the kitchen busy with food and stuff and have a few glasses of wine first. But well, with being pregnant and all, no drinking and cold sober...Anyway. But it was fun to hear how excited everyone was and of course all the same questions, which I'm not sure everyone knows the answers to. So here's the first of my small FAQ list:
It's funny that there are 3 trimesters, yet the first one isn't 3 months, but more like 3 1/2 months, so the 2nd trimester actually starts at 14 weeks. Which, when thinking about it, actually makes sense because the Dr's always calculate the 2 weeks when there is no way there is any baby growing anywhere. Anyway, thought I'd throw in a little trivia there. So here's my 14 week profile. Still no definite bump there, but it's growing!
14 weeks
Rick and I were at a party last weekend and it was the first time that everyone was openly announcing the pregnancy. I am not one for the spotlight (ha, no comments from the peanut gallery...not one for the spotlight when I am sober, that is. Hehe), it makes me uncomfortable. I prefer to have the party so I am in the kitchen busy with food and stuff and have a few glasses of wine first. But well, with being pregnant and all, no drinking and cold sober...Anyway. But it was fun to hear how excited everyone was and of course all the same questions, which I'm not sure everyone knows the answers to. So here's the first of my small FAQ list:
- When are you due? April 17
- Do you want to find out if it's a boy or a girl? Definitely
- Where are you giving birth? John Muir
- Have you felt any movements? No.
It's funny that there are 3 trimesters, yet the first one isn't 3 months, but more like 3 1/2 months, so the 2nd trimester actually starts at 14 weeks. Which, when thinking about it, actually makes sense because the Dr's always calculate the 2 weeks when there is no way there is any baby growing anywhere. Anyway, thought I'd throw in a little trivia there. So here's my 14 week profile. Still no definite bump there, but it's growing!
14 weeks
Monday, October 8, 2007
NT scan ultrasound
I opted to have an NT scan which basically helps rule out if the baby will have certain chromosomal defects; where they perform an ultrasound and do measurements. I was excited and nervous at the same time and couldn't wait to see the baby again! Rick came along for the show this time, so he could finally see that there is really a baby in there. No, that new gut I got in the last few days is not just from the late night frozen yogurt runs. The Dr. told us right away that the baby was looking great and the measurements were perfect, right on target. She also let us hear the heartbeat which was way more emotional than I had thought. We both got a gold star at seeing exactly where the nose, fingers, heart, and legs were. We could even count the 5 fingers in one of the pictures! She said the baby is about 3 inches long and the heartbeat is 158 bpm, good and strong.
12.5 week ultrasound
Thursday, October 4, 2007
12 weeks
Almost at the end of the first trimester! Seems like it's taken forever but at the same time it's gone by so quickly too. I'm not really "showing" yet. It's pretty weird because in the morning I have no tummy at all and by the end of the day I have this huge gut. I would do a picture comparison but am to self conscious to post a picture of what looks like fat at this point. So I'll stick to the morning belly shots, which I think show the true tummy or what I like to think of as the true tummy, before the pasta and the bread and the frozen yogurt (and yes, gas) make their way into the scene and distort everything.
The heartburn seems to have gone away! I am still not eating like I used to but I did venture out of the bland comfort zone and had some spaghetti last night with the spicy marinara sauce I made. I even had salad! Apparently the symptoms start to go away around 11-12 weeks and one starts to feel normal again. I'd like for a few symptoms to stay around, just for comfort. At least until I can feel the baby kick or something.
12 week profile
Sunday, September 30, 2007
You know you live in a small town when...
You know you live in a small town when... (read with the same tone as "You know you're a redneck" humor by Jeff Foxworthy) ...you see your small town bartender, Kiki, at a party and she hugs you to congratulate you on your pregnancy. Yes, Kiki came up to me and gave me a huge hug. Kiki, from Ed's bar. Now I know--am convinced--that every single person here knows I'm finally pregnant. I didn't realize the magnitude of this news until last night; didn't realize the amount of people that really cared whether we were going to have kids. It's actually very sweet and tugs a little at my heart. At the same time, it scares the heck out of me. I am already freaked out about having a healthy pregnancy and am horrified at the amount of attention and following we are getting here. Granted it's a small town, so it's not like the Queen of England is expecting their first heir. But at the same time, the pressure is on, and I am in the hot seat.
Monday, September 24, 2007
Pregnancy Announcement
Friday, September 21, 2007
10 Weeks
What a difference 3 weeks can make! I had an appointment with my OB this time and I got to see another close up of the baby. It is amazing how quickly they turn from a peanut into a baby! S/he was really active, punching the air and kicking around. The picture is actually upside down because I think s/he was doing flips! It was truly a spectacular sight, and I was just so relieved that everything looked great. That little heart beats so fast! I was in awe that only 3 weeks the growth went from .72 cm to 3.34 cm. And it's graduation time too! The baby has developed from an embryo to a fetus!
10 week ultrasound
Dione has also convinced me that I need to start taking some belly pictures to capture the growth from the outside. So I have reluctantly decided to post these as well. This is me at 10 weeks. I don't have a belly yet, right? No, that's just my normal chubby self.
10 week ultrasound
Dione has also convinced me that I need to start taking some belly pictures to capture the growth from the outside. So I have reluctantly decided to post these as well. This is me at 10 weeks. I don't have a belly yet, right? No, that's just my normal chubby self.
Tuesday, September 11, 2007
Tum, tum, tum, tum...TUMS!
Tums are my new favorite candy, out of pure necessity. You see, I have been suffering from heartburn so bad these last few days. I pick what food I can eat based on the acidity. I am mostly eating cereal and bread products. I also just stick to drinking water or milk. Funny that not so long ago I was eating spicy foods and loving it! These days, even the wrong kind of crackers can give me heartburn!
Monday, September 10, 2007
Need a new hobby
Cooking is my hobby. Cooking dinner is my number one thing to do and I usually put a lot of effort into it. So it's quite unexpected that all of a sudden the thought of making dinner, let alone eating it, makes me want to dry heave. I expected to have morning sickness, but having night sickness? Now that one I wasn't expecting. So it's put quite a wrench in things lately. I do not have an appetite for dinner, so eating dinner, going out to dinner, going over to people's houses for dinner is out of the question. Well, I can do this but it's not pretty. I actually vomited for the first time because I forced myself to eat dinner while over at a friend's house. I didn't want to offend by not eating, so I went against my better judgement and just tried to eat. Big mistake, one I won't be making again. I wonder how long I will be like this? It seems like it's been an eternity and I think it's only been a week or so.
Wednesday, September 5, 2007
Holy torpedos
Although my stomach area hasn't changed much, certain things in my chest area are sure growing! And boy do they hurt. I could actually feel them getting bigger today. I need to get a sign to hang around my neck when I'm home with Rick that reads "You can look but not touch" because he's sure interested in the growth spurt! I can only sleep on my back these days. I wake up if even the cover sheet touches them! Ouch!
Wednesday, August 29, 2007
7 Week Ultrasound
This day couldn't come soon enough! Finally, I get to see proof that there is something growing in there. My regular OB was on vacation so I had an appointment with the nurse practitioner. I think she knew how badly I wanted to see the little creature growing inside me, so she immediately performed the ultrasound. It is so amazing that something that tiny can already have eyes and a beating heart! I cried when I heard that everything looked great and I was able to see the heart beating. What a huge relief! The baby measured .72 cm. So tiny and precious!
First ultrasound at 7 weeks
Friday, August 24, 2007
Tahoe
Went to Tahoe for a few days. The weather was beautiful and we did some hiking. We saw a bear! First the bear was high up in a tree so we figured we'd just keep an eye on it because we were fishing about 100 yards away. And then about 30 min. later we hear this huge splash and a groan and I was freaking out because the bear decided to jump into the lake about 20 feet away from us. There are tons of trees, so we couldn't see anything until the bear was swimming in the water! So then the bear saw us and ran back up the hill a bit and stopped and started sniffing at us. We decided it was time to go, right after we took a few pictures. My heart was beating, because it was a cub and I was afraid the mom was going to show up any minute.
Monday, August 20, 2007
Putting things into perspective
Well, you know how a situation can put something back into perspective? Had that a few hours ago and I'm trying to be less irritable. I got a call from my mom telling me that my grandma is in the hospital. She is OK now, but they were worried because they couldn't wake her up this morning. She was breathing but unresponsive. She is in advanced stages of Alzheimer's and my grandpa stays at my mom and her sister's houses a lot to get help. He was up this weekend, so it happened at my aunt's house. They are running tests, but it's happened to Rick's dad (who's at about the same stage of Alzheimer's as well) and it was dehydration, so I have a feeling it was that too. Anyhow, she's responsive now and as back to normal as one can be with that horrible disease. So with my emotions in overdrive these days, I completely lost it and was an absolute wreck and Rick came to my rescue. It was cute because he was upset that I was so upset in my "condition". I think it finally clicked for him that I am hormonal. It's especially difficult for this to happen to my grandma today because this is the day my dad passed away 9 years ago. It's just kind of a hard day for my mom already, and to have her mom in the hospital has brought a lot of her emotions back.
It's also been a day of reflection for me. I found out I was pregnant on my dad's birthday and my due date is April 17, which means I could actually have the baby on my mom's birthday. How cool would that be? I guess it's finally sinking in that this baby might stick around for good.
Sunday, August 19, 2007
Irritability and me
They say you get mood swings when you are pregnant. I had my first (of hopefully not many) today. I am completely irritated about everything.
Friday, August 10, 2007
No sign of my "friend"
Well today would have been the day my period arrived and there's no sign. No cramps, just some pulling and more stretching. I am really hungry right now and all the time. I crave spicy foods and carbs. I'm not craving any sweets or anything, but I did overindulge in some pancakes this morning and I ate way too many. Ughh, too full.
Thursday, August 9, 2007
Wednesday, August 8, 2007
S-t-r-e-t-c-h-i-n-g
I feel some pulls and twinges and it makes me nervous that I'm going to start my period. This is around the time that I would start and I will be so relieved when I get past this time with no period. I have a few milestones to pass before I feel comfortable enough to admit I have a little blastocyst (ball of cells) growing inside me. First step is to pass the week that I would have my period, second step is to pass the day I miscarried the last time, and third step is to make it to my 7 week OB appointment and actually see the little bean.
Tuesday, August 7, 2007
Wake up call 2:30 AM
For the last few days I have been waking up at 2:30 AM and can't go back to sleep for an hour or so. I usually sleep the whole night through so this is something I'm not used to. I think it's because a) I have to get up and go pee, and b) I am having some really bizarre dreams.
Monday, August 6, 2007
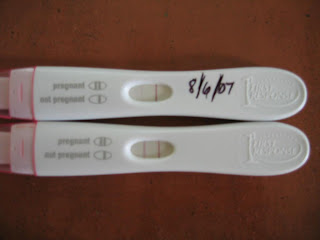
Finally, the second line we've been waiting for!
This is the best birthday present I could have ever imagined. I think Rick had a hunch something might be up when the night before I had said a few weird things. We went to Victoria's Bakery to get my favorite dessert, cheesecake. After that, we went to La Toscana for dinner and Trevor and Karyne joined us which was a nice surprise! Well, I was in my "no drink zone" since I knew I had ovulated...but it was my birthday so I decided to milk a glass of wine. I took one sip of the wine and it just didn't taste right. Rick tried it and said it was good. Weird. I was also very tired at dinner and just wanted to get home and eat my cheesecake. I was pretty adamant about that cheesecake, but it got too late, so we just went to bed. I had a hard time sleeping that night, unbeknownst to me that this will be a trend to come.
The next morning was Sunday and we usually hang out in bed for a while and talk. Well Rick mentioned that I should take a pregnancy test. That got me excited and nervous because I don't think he's ever been the assertive one in that department. I did some calculations in my head and told him that this would be the first day that I may actually get a (+) test if I tested with the First Response Early Response test, which of course I already had stocked in the bathroom. So I took it and it was this barely there shadow of a line. I literally had to disect the test to look closer. Rick couldn't see the line but I knew it was there. So we decided to try to keep sane and take another test the next morning, just to confirm. And the next day it was no mistake, I was pregnant!!
Test on 8/05/07
And because I seriously doubt you see that line, even with the arrow pointing to it...here's a picture of the one I took to confirm the next day and then 1 week later, the obvious double line confirmation.
Monday, July 30, 2007
Rosemary Lemon Chicken
I made this the day before a party to pop in the oven and slow cook until all the food was ready. I think this is pretty much fool proof however long you want to cook it.
Preheat a large skillet to med-high temp. Pound out boneless and skinless chicken breasts into thin cutlets. Cut in quarters, if necessary. Salt and pepper both sides. In a plastic ziplock bag, add 2 cups of flour and season with paprika to taste. Add cutlets to plastic bag and shake. Add enough olive oil to coat the bottom of your preheated skillet and add 2 pats of butter. Shake off excess flour from cutlets and add to the pan. Cook each side till golden browned but not cooked through. Place browned cutlets into baking dish. Work in batches, adding more oil and butter as needed.
Once all the cutlets are browned, skim off excess fat from pan and add a 1:3 ratio of white wine to chicken stock to pan drippings. For example, 1 cup white wine to 3 cups chicken stock. Crank up heat to high and whisk until bubbling. Cook for 15-20 minutes or until slightly thickened and reduced.
Meanwhile, finely mince a few sprigs of rosemary and sprinkle over chicken cutlets. Thinly slice a fresh lemon and place one lemon slice on top of each chicken cutlet. Once pan gravy is ready, pour over chicken cutlets. You should have enough pan gravy to coat the bottom of the baking dish. Cover with foil wrap and place into refrigerator until next day, or you can cook this right away in a preheated 300 degree oven for 1 1/2 hours.
If cooking next day, preheat oven to 250 degrees. Place foil covered baking dish into oven and cook on this temp. until 1 hour before party, up to 3 hours beforehand. One hour before serving, raise oven temp to 300 degrees and cook for 1 hour. Remove foil and serve.
Veal Rollotini with Pesto Mashed Potatoes
Preheat oven to 400
Place 1 large skillet, 1 saute pan, 1 sauce pan, and one large pot onto stove top
Pound out veal cutlets w/ meat tenderizer until very thin. Salt and pepper both sides and set aside to become room temperature. Meanwhile, make the pesto for the mashed potatoes. Place bunch basil in food processor with salt & pepper, 1 clove of garlic, and 2 tablespoons water. Run on low setting and slowly drizzle in olive oil until paste like consistency. Spoon contents into bowl and set aside. In same food processor (no need to clean it out), place 1 medium sized roughly chopped carrot and pulse until coarse but not grated. Scrape contents into a saute pan that is on medium heat and lightly coated with olive oil. While carrot cooks, repeat the same process with the onion in the food processor, add to skillet with carrots, pulse the 1/4 cup of mushrooms in same manner, and lastly the 1 cup of spinach. Add salt and pepper to season as you go. Saute all ingredients until wilted and tender, onion is opaque in color. Set aside and let cool. Add 1 cup ricotta cheese and 1/4 cup bread crumbs to vegetable mixture and mix well.
Peel 3 large potatoes, quarter, and place in cold salted water. Bring to boil and cook until fork tender. In a small sauce pan, melt 1/2 stick of butter, 1 cup of milk , 2 chopped garlic cloves and simmer for 15 minutes. Work potatoes, butter/milk/garlic mixture and pesto mixture until mashed well but not over worked. Spoon into buttered casserole dish and place in oven to bake for 20 minutes or until golden on top.
Place cutlets on flat surface and spoon 1-2 tablespoon of vegetable/cheese mixture onto center of cutlet. Roll as you would a burrito or egg roll. Secure with toothpick and dredge veal roll in seasoned flour and set aside. Continue same steps with remainder cutlets. Heat large heavily oiled skillet and add veal to brown all sides of veal rollotinis. Remove from skillet and add 2 cups port to deglaze skillet. Add 1 cup chicken broth and 4 sprigs rosemary, salt and pepper. Cook on high until mixture reduces down by half. Add veal rollotinis back to port sauce to reheat for 10 minutes on low.
Spaghetti with Spicy Sausage and Spinach Tomato Sauce
Place 1 Stock Pot filled with cold water, 1 large Saute pan, and 1 medium size Sauce pan on stovetop.
Turn Stock pot on High to boil water. Meanwhile, heat Saute pan and add sausage. Begin breaking up meat to crumble. Cook till done and drain. Add spinach and mix until well incorporated. Put lid on pan and set aside. Heat Sauce pan to medium. Coat bottom with olive oil. Dice large onion and add to pan. Salt and pepper to season and cook till opaque. Add 1 tablespoon of Italian seasonings. Add entire can of tomato paste and stir till thick and warmed. Add entire contents of Diced tomato can, and 1 cup chicken broth. Mix well and lower stove to a simmer for 10 minutes. If you like chunky sauce, leave as is. If you want, you can use a hand blender to puree, or carefully transfer to blender to puree. Return back to Sauce pan. Add sausage and spinach and stir until incorporated. Simmer for additional 10 minutes.
When water in Stock pot comes to a boil, add a generous amount of salt and pasta to pot. Boil as directed or until al dente. Drain pasta and reserve some of the pasta water to add if the Tomatoe sauce is too thick. Add sauce to pasta in stock pot and simmer for 5 minutes. Serve with Parmesan cheese and crusty bread.
Penne Pasta with Roasted Chicken in a Sun Dried Tomato Cream Sauce
You can start by roasting a chicken in the oven or your rotisserie, but I prefer the easy way of buying one of those pre-made roasted chicken from your local grocer. They are typically in the deli section and sometimes they are under a heating lamp. If you can, ask for a fresh out of the oven one from the person behind the deli counter.
Cook your pasta to al dente, still firm. Meanwhile, shred half of the roasted chicken, breast, thigh, and leg.
In a large saute pan, add some olive oil to sweat some chopped shallots and garlic. Season this and let simmer until opaque. Add a pat of butter and some flour and cook on med. heat till a light rue is formed. Wisk in some white wine and kick up the heat to a boil. Add some chicken stock until you have a nice thin sauce. Add some heavy cream and parsley, sun dried tomatoes, pepper, old bay seasoning and thyme. Reduce back to simmer. Sauce will thicken the longer it is simmering.
Drain the pasta and reserve some of the pasta water if you need to thin out the sauce. Add the pasta to the saute pan to incorporate with the sauce. Add the roasted chicken and mix well. If it's too dry, add the reserved pasta water. The pasta will suck up more of the sauce as it continues to cook. Simmer till heated through, about 5-10 minutes. You can add parmesan cheese to the top before serving, if you want to make it that much more decadent. I serve this with a green salad with light oil and vinegar dressing to break up the richness a bit.
Meatloaf with Green Mashed Pea-tatoes
You can use ground beef or ground turkey, or you can get creative like I have been and use ground venison or ground elk. My husband is a hunter and believe me, anything that adds flavor and disguises game meat, I'm all for.
Preheat oven to 350.
This recipe we'll go with the traditional meat of choice: ground beef. To a large bowl, add bread crumbs and milk, catsup (or chili sauce to give it a kick), egg, parsley, chopped carrots, onion and celery. Add salt and pepper to season (you can also add some italian seasonings) and mix well. With hands, gently mix in ground beef. Don't over mix or it gets tough. Dump contents into a loaf pan and place in preheated oven to cook for about an hour. It will shrink up a little bit when its done.
Peel potatoes and place in large stock pot. Cover with water, add salt and bring to a boil. Cook until fork tender. In a separate container, or in the microwave, cook frozen peas until soft. Place cooked peas into blender with milk and 1 clove garlic. Blend until smooth and has a pea-soup consistency. Drain potatoes and mash with the pea mixture. Season to taste. Add butter, if desired.
You can serve with fresh corn on the cob, canned corn, or other country vegetable of choice. Goes really well with biscuits too.
Chicken Chili with Cornbread
I made this the other night for Sunday dinner. Chili is always better when it has time for all the flavors to combine. Start out with dicing 1 large onion, 2 carrots, 3 celery stalks, 1 green and 1 red bell pepper. Dump this in a large stock pot that has been heated on Med., bottom coated with olive oil. Saute until soft. Add a large palm full each of cumin and chili powder and simmer for 5 min. Add some thyme, cayenne pepper, red chili flakes, salt and pepper to season. Add 1 can tomato sauce, 1 can diced tomatoes with juice, 1 can green tomatilla sauce, and 1 can diced green chilis. Add 2 quarts of chicken stock, 4 cans of white beans (or 2 cans white beans and 2 cans pink beans...or any combination of beans you like). Add 3 bay leaves. Let cook on simmer for at least 3 hours. In the meantime, you can either brown some boneless skinless chicken breasts and cube up, or cook a whole roaster chicken and pick apart. I added 4 large boneless skinless chicken breasts and half of a roasted chicken to my chili. If you are serving this the same day, add the chicken and cook another 2 or so hours so that all the flavors come together. If you are serving this the next day, add the chicken and let cool until you can refrigerate. To heat up, place stove temp on simmer and bring the pot to a boil for 2 or so hours before serving. I serve with sour cream, monterey jack cheese, and green onions (scallions). I love cornbread with this too. I just buy the premade mix and follow instructions.
Venison Backstrap
I don't eat red meat too often, and if I do it's only in ground beef form. But my husband loves it and according to him, I've perfected the method of cooking it. Venison cooks really quickly and it's a very lean meat. I get a cast iron skillet really hot. I also let the venison sit out until it's room temperature. You can season with whatever you want or even marinate the meat. Make sure you wipe off any excess moisture. The meat should be pretty dry because you want to create a crust to lock in the juices. Place it on the hot skillet for 4 minutes. Do not touch the meat until you flip it over. Let it do its thing. Flip once and cook for another 4 minutes. Then remove from heat and let the meat sit for at least 8 minutes. It will continue to cook until medium rare to medium doneness and redistribute the juices throughout the meat. I find this same method effective for almost any type of steak, as long as it's about 1/2-1 inch in thickness. Anything thicker than that you'd probably want to increase the cooking time on each side.
Pan-fried Halibut and Pesto Pasta
Get your pasta water ready. Pick your favorite pasta. I like linguine. Boil till al dente. Meantime, in a food processor, place 2 large bunches of basil or Arugula, 1 clove garlic, 1/2 cup toasted pine nuts, 1/2 cup grated parmesean cheese, a palm full of each salt and pepper. Turn on and slowly add olive oil until a slightly thick paste forms. Drain pasta and stir in pesto. You can add more olive oil, or butter if it's too thick. Set aside.
I prefer the halibut in filet form, as opposed to steaks with the skin, but either will work. Rinse and pat dry, and season both sides with salt and pepper. Get your skillet nice and hot, and add a coating of olive oil. Dredge halibut through some flour and pan fry till browned on both sides. Remove from heat and let rest. In same pan, turn the heat on simmer, add 1 large juicy lemon to deglaze pan. Add some butter and parsley, and stir till a light sauce is formed. Pour over halibut. Spoon pesto pasta on the side.
Chicken Potpie
I take the short cut and buy a pre-roasted chicken (see previous entry about this). The only thing this recipe involves is a lot of chopping. Also, if you are good at making pie crusts, this dinner choice is for you. Warm up a large saute pan or stock pot to med/high. Start cubing your vegetables. I like to peel my potatoes and carrots, but it's optional. Peel and cube 2 potatoes and 2 carrots. Layer the bottom of the pan with olive oil and add the potatoes and carrots. Season with salt and pepper. While these are cooking, cut up 3 large stalks of celery, and 1 large onion. Add this to the pan. I like to use fresh thyme, but you can add dried thyme, and any other herbs you like. I also add Old Bay Seasoning. Let this all cook until things start to look tender. Again, this is optional, but I like to deglaze the pan with 1/2 cup of white wine and let cook down until it's pretty much absorbed. While this is cooking, dismantle the roasted chicken, cubing up the meat into about the same bite size as the vegetables. You'll get about 4 cups of meat. Back to the pan, add about 1 cup of chicken stock, or until the liquid covers just to the top of the vegetables. Scrape up any bits stuck to the bottom of the pan. Now add about 1/4 cup cream or until the sauce is just pale yellow. You don't want the sauce to be white. Add the chicken and 2 cups frozen peas. I like to chop up some fresh parsley and add this as well. Mix together and transfer to an oven safe casserole dish. Now, if you wanted to be really lazy, you could substitute pretty much all the chopping with buying the frozen mix veggie pack of carrots and peas. You could also buy the frozen potatoes and the frozen onions. If you do this, start the pan with the chopped celery, and then add the potatoes, the liquid, and the rest of the frozen veggies. Anyway, now preheat the oven to 400. Make your pie pastry the way you like it, but add 1 tablespoon pepper and 1/4 cup parsley and 1 teaspoon salt to season the pastry. Place over the filling and brush some egg over the top if you want. Cook for about 30-40 minutes until the pastry is golden and the filling is bubbling. I like to put the dish on a cooking sheet in case the filling bubbles over.
Stuffed Bell Peppers
You can use any color bell pepper, I prefer the sweeter red, orange and yellow bell peppers. Preheat oven to 400. Cut the tops off 4 bell peppers and clean out the seeds and the rib part. Make white rice, using 1/2 cup long grain rice. Follow proper measurements, as instructed. Cook this until still slightly chewy, about 5 minutes before it's ready. In a large saute pan, start cooking 1/2 pound of spicy sausage and 1/2 pound ground beef, till crumbly. Add 1 medium size chopped onion, and 2 cloves of chopped garlic. Once onion is tender, add a palm full of Italian seasoning, salt and pepper to taste. Add 1 can of tomato sauce and stir well, on simmer, till flavors come together. Add white rice and about 1 cup of cheese you like. I use the Italian cheese mix, already grated, but you can use any grated cheese you like. Parmesan might be too salty though. Mix well until incorporated. Place stuffing into bell peppers and set upright into a dish that can tightly hold all 4. A deep pie dish seems to do the trick most of the time. You can top the bell peppers with bread crumbs and cheese, or just cheese. Pour some water in the dish, just until it's about 1/2 inch high on the bottom of the bell peppers. Cook for about 30-40 minutes or until top is browned and bell peppers are tender. If the cheese browns before it's done, place aluminum foil over the top. You can serve with fresh corn on the cob, like my Mom does.
Potato Salad
Although not a dinner, but a side dish, this is in honor of Mother's Day and I'm posting the slightly modified version of my Mom's Potato Salad. You can make as little or as much as you want, but this recipe should serve about 15 to 20 people.
Fill 2 large pots halfway with water. In the larger of the 2 pots, add 7 large russet potatoes. Bring to a boil and cook for about 20 minutes or just until the fork can penetrate through, but with some resistance. In the other pot, add 6 eggs (12 if you plan to put deviled eggs on top). Cook the eggs until hard boiled. While these are boiling and then cooling, in a large bowl add: 1 medium diced onion, 3 stalks chopped celery, and 4 large spoon fulls of dill pickle relish. In a separate bowl, add 2 cups mayonnaise, 2 tablespoons mustard, a dash of garlic powder, 1 tablespoon pepper, and a few dashes of salt. Mix well. Once potatoes have cooled, peel the skin and cube into bite size pieces. Add to the large bowl. Also peel and dices up the 6 hard boiled eggs and add to the bowl. Mix all to incorporate. Pour the mayonnaise dressing into the large bowl and mix until well incorporated. Refrigerate for a few hours before serving.
Portobello Mushroom with Spinach and Sausage Stuffing
Preheat oven to 425. In a medium pan, start cooking pork or turkey sausage until crumbly. Set aside. In same pan, add 1 large chopped shallot. If you don't have enough reserved drippings from the sausage, add some olive oil. Add a large bunch of spinach and let wilt. You can use frozen spinach, but make sure you thaw and drain. Meanwhile, get your portobello mushroom ready. Scoop out the stem and the insides. Season with salt and pepper. Drizzle with a small amount of balsalmic vinegar and olive oil. Set in oven and cook for 5 minutes or so. Back to the pan...In same pan, add some cream and a handfull of mixed shredded Italian cheeses. You can buy that pre-packaged. Add the sausage back to the pan and mix until incorporated. Remove mushrooms from oven and scoop the pan filling into the mushroom. Top with bread crumbs and some melted butter. You can also use panko for extra crunch. Cook in oven for about 20 minutes or until bubbly. Serve with a mixed green salad dressed with oil and vinegar.
Turkey Cutlets with Sage and Parmesan Cheese
Pound out your cutlets a bit to get them nice and thin. Season with salt and pepper. Place 2 sage leaves in the middle and add 2 slices Parmesan cheese. Roll the cutlet as you would a burrito. Get a skillet nice and hot and add some olive oil. Brown the cutlets on each side. Remove from pan and set aside.In same pan, make your gravy. Add some flour to the pan and scrape any bits off the bottom. Cook until the flour is light brown in color. Add some chicken stock, few dashes of poultry seasoning, few dashes of dried sage, and salt and pepper. Add milk if you want a richer gravy. Cook until bubbly and thicker, and add the cutlets back to the gravy. Simmer for 5-10 minutes.I like to serve this with creamy polenta. Cook polenta as directed, on stovetop. Add 1/4 cup of heavy cream, 1/4 cup of Parmesan cheese, and 2 tablespoons of butter at the end of the cooking time. I also like to add fresh chopped rosemary, parsley and thyme at the end. Mix well until incorporated.
Pork Tenderloin Roast Stuffed with Cranberries
Take about 1 cup of dried cranberries and add them to a small pot. Fill the pot with water halfway, and place on stovetop on simmer for 1/2 hour or until cranberries are soft. Drain the water. Mince some sage and rosemary, and add to the pot. Set aside to cool.Preheat oven to 400. Butterfly 2 pork tenderloins. salt and pepper the insides and add the cranberry mixture to one of the tenderloins. Place the other tenderloin on top, like you would a sandwich. Tie the roast with some kitchen string. Salt and pepper the outside, and rub some flour over the roast.Get a large skillet nice and hot. Add some olive oil to the pan and then add the roast, browning on each side. Transfer the roast to an oven safe dish and cook until internal temp reaches 155 degrees. Let sit for 15 minutes before cutting. You can make a gravy with the pan drippings, if you want.I serve this with mushroom herb couscous.
Shrimp Scampi with Linguine
Whatever shrimp you prefer, make sure they are deveined, peeled, and tail is off. Soak the shrimp in salted water for about a half hour.Meanwhile, get your pasta water ready.While you're waiting for the water to boil, start mincing 6 cloves of garlic, and a handfull of fresh Italian parsley (there is really no substitution for this in this dish, the flavor just pops with the fresh stuff). Drain the shrimp and season with the garlic, pepper, and Old Bay seasoning.Boil the pasta till a little bit more than al dente.While the pasta is cooking, saute the shrimp for a few minutes on each side and then set aside. Don't over cook, or they get chewy.Drain the pasta, and put it back into the pot. Spoon the shrimp into the pot, and add 1/2 stick of butter and drizzle olive oil until the pasta isn't sticky anymore. Add more fresh black pepper, some more salt, and the chopped parsley. Stir together and serve.
Braised Beef Short Ribs
I used the boneless kind, but you could get the ones with the bone in. Get a large oven safe heavy pan. Cast iron works well, but any large oven safe pan will work. Get the pan nice and hot. While it's preheating, season your ribs on both sides with salt, pepper, and Old Bay Seasoning. Dredge through flour and shake off excess. Coat the pan with olive oil and brown meat on all sides until a nice crust forms. While meat is browning, dice 2 medium onions, 2 carrots, 2 stalks of celery, and 6 cloves of garlic. Preheat the oven to 350. Remove the meat from the pan and set aside. Add the onion, celery, and carrots to the pan with the meat drippings. Add some salt and pepper and let saute until tender, about 5 minutes or so. Drop the heat down to medium-low and add the garlic. Saute for another few minutes. Open a drinkable bottle of red wine and pour half the bottle into the pan. Let cook for a few minutes. Now add a small can of tomato paste and mix well. Add a can of mushroom gravy. This will help thicken the sauce some more. Now add about 3 cups of beef stock, or until the sauce just covers the meat, once you put the meat back into the pan. Mince 2 springs of rosemary, 2 springs of oregano, 2 sprigs of thyme, and a handful of parsley together. Add to the pan and stir. You can also used dried herbs, about 1 tablespoon of each. Drop the meat and the juices back into the pan. Put a lid on the pan and transfer to the oven. Let cook for 2 hours or until the meat is starting to fall apart. I like to serve with cheesy polenta or risotto and green beans.
Nothing like a hearty meal for Sunday night supper. I mixed 1/2 pound of ground sirloin with 1/2 pound of deer sausage (see previous posting of trying to hide the deer meat in tons of flavor). You can be normal and get a combo of ground beef, ground sausage, and ground veal. Or you can substitute for ground turkey and any other combo. I take some short cuts in this by buying the Italian style bread crumbs and the already shredded "powered" Parmesan cheese. Finely dice up a medium size onion and start to saute in about 2 tablespoons of olive oil. Finely dice up 1 clove of garlic and add it to the onion at the very end. Turn off heat and let cool. Finely dice a large handful of parsley. In a large bowl, add 1 egg and about 1/2 cup of milk. Beat together. Add the parsley, onion and garlic mix to the bowl. Add all the ground meat and (this is the fun part) start mixing this all together with your hands. Add about 3/4 cup of the bread crumbs and continue to mix well until it's all incorporated. Lots of recipes tell you to mix the bread crumbs with the milk beforehand, but I think it clumps together too much, and doesn't get all incorporated into the meat. At this point you can put back into the fridge for 1 to 24 hours, or you can continue to make the meatballs.Preheat oven to 350. Take an ice cream scoop if you want consistent sizes, or scoop up enough meat and begin to roll into a ball between your palms. You can make whatever size you want, and alter the cooking time accordingly. For small meatballs, cook about 15-20 minutes, add a few minutes to med. size, and so on.You can add these to tomato sauce, and serve over pasta or you can make them into a Swedish style with cream sauce. Or you can make them into appetizers.
Spanish Rice Dish that I can't spell but phonetically pronounced as "Pie-A-ah"
I think this is one of those recipes that if you had someone from Spain over and you made it for them, they would think you were smoking something. But I don't like bi-valve muscles and it's hard to find most of the other ingredients at my local grocer...so I adapted. I should probably make up my own name for the dish, but am not feeling a name for it. Any suggestions?Preheat a medium sized, oven proof pan. Add 1/2 "tube" of chorizo, which can be found in the Mexican foods refrigerator section. If you find the hard chorizo, it looks like a sausage or pepperoni shape, dice that up and add to the pan over medium heat. When the fat starts to render, add 1 medium diced onion and 2 cloves of diced garlic. Cook on medium heat for a few minutes. Add 1 cup of white rice to the pan and cook for another few minutes, so the rice starts to absorb the flavor. Add 2 1/2 cups of chicken stock and continue to cook on medium heat for about 10 minutes. Meanwhile, preheat the oven to 375.After about 10 minutes of cooking on the stove top, add about 1 1/2 cups of frozen peas, and about 3 cups of frozen (shelled, deveined) shrimp. Add about 1/3 cup of freshly chopped parsley. Stir to incorporate and put the lid over the top of the pan. Place in the oven and cook for about 20 minutes.
Carne Asada Tacos
The prep is pretty quick and easy, but the cooking time is long. Marinate a flank steak with 2 packages of taco seasoning, 4 roughly chopped garlic cloves, 1/4 cup of Worcestershire sauce and 1/2 cup of water. I usually add all this to a ziplock bag first, mix it all up and then add the flank steak, and then massage the marinade into the meat, because it's easier to flip and it's not messy. Let marinate in refrigerator for 1 to 4 hours.Preheat oven to 350. Meanwhile, on the stovetop, heat a large oven proof pan until smoking hot and sear both sides of the flank steak until browned. Remove from heat. Add 1 large chopped onion, 1 large chopped poblano chili pepper, and 3 cups of chicken stock. Cover and place in oven for 2 hours. You can tell it's done when you poke the steak with a fork and it starts to fall apart. Cut the meat in 3 separate parts against the grain and then using 2 forks, start shredding the 3 sections of the meat. Replace the cover and let stand until ready to serve.You can serve with soft corn or flour tortillas, shredded cabbage, green onions, salsa and sour cream, guacamole, and cheese, or any other variation.
Poached Mahi Mahi with Coconut Rice
Start with the rice, it takes the longest. Put 1 1/2 cup water and 1 cup light coconut milk, a few pinches of salt and a pinch of sugar into a med. size pot and bring to a boil. Add 1 cup of rice (long grain, but basmatti might make a nice variation), bring back to a boil, cover top and turn the heat down to simmer for 25 minutes.Meanwhile, you can prep any veggies for cooking. I steamed broccoli and red bell pepper with this dish.Season both sides of the Mahi Mahi with salt and pepper. Pour some orange juice just until it barely covers the bottom of a saute pan, and turn the heat on med. Add the Mahi Mahi and put a cover on the pan. Poach for about 5 minutes on each side or until your desired doneness. I like my fish a little on the medium side, as opposed to completely cooked.
Pizza in a Bowl
This is not an especially healthy meal, but it is easy and made in one pot and it's really satisfying comfort food. My only suggestion is to save this one for a colder day. It gets hot in the kitchen. I like to use the Hot Jimmy Dean Sausage, but you can substitute any meat topping, or any "topping" in this dish for that matter. Once you get the basic concept, you can treat it as you would any pizza. Get a large deep dish skillet smokin' hot and add the sausage. Start breaking it up into larger chunks and let brown. Remove from pot and set aside to drain. In the same pot, add 1 package of pre-chopped mushrooms, or chop about 10 large mushrooms. Brown the mushrooms and then add them to the top of the sausage that is draining off to the side. Turn the heat of the pan down to medium. Cube up one loaf of day old bakery bread. I like to use the Potato Rosemary, but you can use ciabatta or even sourdough, but it should be a little stale because you don't want the bread to break down too much, you also don't want croutons. Once cubed into bite size chunks, add to the pan and try to keep it at one layer so it all starts cooking evenly. Season with salt and pepper, and drizzle some more olive oil on top. Dice 4 cloves of garlic and add this to the pot. Stir to incorporate the garlic and to start to brown the other sides of the bread. This will take about 5 minutes total. Now chop 4 medium size tomatoes and add to pan. Let this break down for another few minutes. Add 1 can of diced tomatoes, juice and all. Now add the sausage and mushrooms back to the pan. Chop up a handful of Italian parsley and a large bunch of basil. Add this to the pan and mix well. Turn the heat down to low. Cut (lengthwise) some fresh mozzarella and add to the pan, layer on top. Put a lid on the pan and turn off the heat. Let sit for about 10 minutes, until the cheese melts. You can also add some Parmesan cheese or you can substitute any "pizza" style cheese you want. You could probably make this a lot healthier by using veggies instead of sausage too. See what I mean about it being versatile?
Green Beans and Potatoes
This is really a side dish, but I can eat it as a whole meal. I have to add a salad and some sort of meat product for the husband.I use the flat Italian green beans, which are meatier, but you can also use the Blue Lake green beans, or any other that you prefer. I use about 4 good handfuls of beans in this dish. Wash and prep as you would for serving, however, cut in half or thirds, depending on how long the beans are. Fill a pot with some water and add the beans. Bring to a boil. While the water is coming up to a boil, cut 2 medium sized yellow potatoes, or 3-4 small red potatoes into bite sized pieces. You can keep the skin on if you want. Add to the pot of beans that are now boiling. Peel 5 cloves of garlic and also add to the pot. Now add a pretty generous amount of salt and boil the beans, potatoes, and garlic for about 20 minutes or until the potatoes are fork tender.Preheat a large skillet on med. high. I use pancetta, but you can also use bacon or ham. Dice into small pieces and brown. While this is browning, dice half of a yellow onion and also add to skillet along with the bacon. You can drain the fat, or use the drippings instead of olive oil. If you drain, add about 2 tablespoons of olive oil and 1 tablespoon of butter. If you don't drain, just add 1 tablespoon of butter.Drain the beans, potatoes and garlic, and add to the hot skillet. Continue to fry all of the contents and toss until all is incorporated, about 10-15 minutes. Add salt and pepper to season.
Recipes
Crab Ravioli
Since it was Sun. we had some time to make the pasta, but you can use the store bought pasta squares, which are also the won ton wrappers that you buy in the refrigerator section next to the Asian foods and tofu products.For the filling, I used 3 large crab legs with claws. I would guess you could use 1 small can of lump crab meat for substitution. You're going for about 1 cup of crab meat. Drain all the water and pat dry. Add about 1 cup of ricotta cheese, and lemon zest from 1/2 a lemon. Chop up about 1 tablespoon of fresh Italian parsley and add. Season with salt and pepper and mix well. This made about 20 medium size ravioli. These only need to boil for a few minutes.For the sauce I made a marscapone lemon cream sauce. In a small saucepan, juice 1 lemon, add 1/3 cup marscapone cheese and about 3 tablespoons of milk. Whisk until smooth. Turn the burner on low heat and slowly whisk in about 2 tablespoons of butter. Continue to whisk until hot, but not boiling. Salt and pepper to taste.Pour sauce over ravioli and serve. It's pretty rich, so I just served a mixed green salad with a light vinaigrette dressing.
Crab (how to prep and cook)
Rick went crabbing for opening season and we had our first experience on cooking live crab! It was very cool. He caught dungeness crab, so this is for that variety.
Place the live crab in the freezer or on ice for half an hour to put them into hibernation. Meanwhile, fill a large stock pot with water and bring to a rolling boil. Add enough salt to taste like the ocean. To prep the crab, quickly remove the top shell part by prying open the tab opposite of the head. Clean out all of the insides and the lungs and gills. Break the crab in half lengthwise for an easier clean. Add the crab to the boiling water and cook for 15 minutes. Take out of boiling water and quickly plunge int an ice bath to stop the cooking process. Remove and serve. Otherwise, remove from water and let cool about 10 minutes before serving. Crack the shells with nut crackers or shellfish crackers. You can also pre crack with small hammers or mallets.
Dipping Sauces
Fresh crab doesn't really need anything, but if you want to dress it up, you can use the following:
Shellfish Dip- 2 parts mayonnaise, 1 part ketchup and a few drops of Tabasco sauce to taste.
Drawn butter- to clarify butter, melt in a saucepan and let cool to separate. Skim off top layer and reheat clarified butter.
Garlic and olive oil- Chop up lots of cloves of garlic, add olive oil, salt and pepper, crushed red pepper and parsley to taste.
Split Pea Soup
Great for winter nights or for soup parties! Preheat a large pot on med/low and coat the bottom with olive oil. Dice a med. onion, 3-4 stalks of celery, and 2 carrots (salt and pepper to taste) and saute until soft. Look at the back of the package or your dried split peas for cooking time and prep. I like the soup thick so I also dice up 1 russet potato (peeled) and add that with about 1 quart of liquid. I use chicken or vegetable stock for the liquid (you can use water and add more salt and pepper, or bullion cubes). Also with the liquid add a few diced up strips of bacon (you can use ham or pancetta too), and tie together a few sprigs of fresh thyme, Italian parsley, bay leaves, and oregano so you can easily remove it later. Simmer all of this for at least 2 hours and then use a hand blender/mixer to puree some of it to make it a creamier consistency. for a richer touch, you can add sour cream and croutons and chives to the bowl before serving. Some other additions to spice it up a bit: Add some curry or cumin with your liquid.
If you want this to last all day, transfer to a slow cooker on set to low so people can help themselves to warm soup any time.
Cauliflower "Faux"-tato Casserole
Ingredients: 1 head of cauliflower, 2 small creamer potatoes, buttermilk, Parmesan cheese, bread crumbs, butter, parsley, thyme.
Cut 1 head of cauliflower into florets. Peel 2 small creamer potatoes and cut into large quarters. Place into large pot and cover with cold water, just until covered. Boil until potatoes are fork tender. Drain and place into food processor. Turn food processor on and slowly add buttermilk, until you get the consistency of mashed potatoes. Add salt and pepper to taste, half stick of butter, chopped parsley, 1/4 tsp. thyme, and 1/2 cup Parmesan. Pulse until mixed. Pour into casserole dish and sprinkle with Italian style bread crumbs. Place in preheated 375 degree oven and bake for 30 minutes or until top is slightly browned.
Chicken and ham (or prosciutto) roll
I found thinly sliced rosemary garlic ham in the deli meat section at Costco. This inspired me to make these chicken rolls. Pound out or thinly slice boneless skinless chicken breasts into cutlets. Place one slice ham, or you can use prosciutto, on top of the cutlet. Sprinkle grated parmesan or romano cheese on top of ham slice. Roll cutlet, starting from the narrow end. Secure with a toothpick. Do this for all remaining cutlets. Season all sides of cutlets with salt and pepper. While your skillet is getting nice and hot on med. high heat, prepare your flour for dredging. Place a few tablespoons of flour into shallow dish. Season flour with garlic salt and Old Bay seasoning. Dredge chicken rolls into flour and shake off excess. Add some olive oil to coat bottom of skillet. Place chicken rolls into skillet, toothpick side down first. Brown all sides. Remove from skillet once all sides are browned. Deglaze skillet with a generous portion of white wine. Once cooked down for a few minutes, add some chicken stock. I used about a cup of white wine and half a cup of chicken stock. Let the sauce cook down for a few minutes more on med. high heat. Add the chicken rolls and any remaining juices back to the skillet with the pan gravy. Turn heat down to low and cover. Turn rolls every few minutes. Sauce will continue to thicken. I let this simmer for about 15 minutes. I served with wild rice and green beans, but you could probably serve with pasta and spoon the sauce over the pasta. I think if I served over pasta I might add some capers too. You could even make it creamy by adding some half and half or heavy cream at the end.
Risotto
I realize I haven't given risotto the spotlight it deserves. I usually serve this as a side dish, but it can be a main dish and it can be as complicated (or not) as you make it. I'll add some variations to what I've done during the steps of the process.
Start with heating up your chicken, vegetable, beef, or seafood stock. You can buy the cans or cartons, or use your own. I typically use the equivalent of 1 quart of liquid, maybe a little more if I don't add the wine in the beginning.
In a deep saute pan, add a pat or 2 of butter and about 1 tablespoon of olive oil. Heat pan on medium and add about 2 cups of the risotto. I use the Arborio rice, which is thicker than the long grain rice, but you can use either. I don't think long grain uses as much liquid. I also add 1 medium finely diced onion and saute with the rice until both are slightly opaque (5 minutes or so). Now you can start adding the liquid. If you want to use wine, add about 1 cup of dry white wine that you also like to drink. I love the Peju Sauvignon Blanc for this, but you can use any wine really. You could even use champagne as well. If you don't want to use wine, then add 1 cup of your cooking liquid of choice. At this point, I'll add the garlic as well if you want to use that too. About 2 large cloves finely chopped will add a nice flavor. If you have saffron, add this now as well. Just a pinch goes a long way. Stir every minute or so and continue to add a cup of your cooking liquid once all the liquid is absorbed and the rice starts to sort of stick to the bottom of the pan. When the rice is starting to soften, but still chewy in the middle, you can add any one or combination of the following (these are just my favorites, but you can get creative on your own): frozen peas, chopped asparagus, chopped spinach, chopped raw shrimp, a large handful of grated Parmesan cheese. Add your last cup or 2 of liquid and stir and cover and let sit for 5 minutes or so, off the burner. When you are ready to serve, you can stir in another pat or 2 of butter, truffle oil, and/or fresh chopped parsley.
Note: You may need more or less liquid than stated above, depending on your taste. You might like a more al dente risotto, or a saucier risotto. Adjust accordingly.
More Variations
Mushroom Risotto: saute with butter and olive oil until browned and then add the risotto and onion, cont. with the rest of the instructions. Porcini mushrooms are awesome in this, finished with truffle oil. You must soak the mushrooms as directed, and save the mushroom broth to add to the liquid.
Veggie Risotto: saute finely diced fresh carrot, bellpepper, and celery with butter and olive oil until soft and then add the risotto and onion, cont. with the rest of the instructions.
Sausage Risotto: Andouille or linguica or any other spiced sausage in casings work as well. Precooked sausage, just cut into bite size pieces and brown, add the butter and olive oil and then add the risotto and onion, cont. with the rest of the instructions.
Chicken and Rice "Fiesta" Bake
Ingredients: Chicken tenders, 1 cup long grain white rice, 2 avacados, 1/4 cup salsa, 1 can rinsed, drained black beans, 1 can tomato sauce, 1 can full of chicken broth, 1/2 onion, 1 red bellpepper, 3 cloves garlic, 1 cup or more grated cheddar cheese, salt and pepper, and paprika.
Set stovetop to med heat and preheat a large suacepan. Add diced onion (1/2 large, or 1 med. size) and 1 diced red bellpepper until softened, about 5 min. Add minced garlic cloves, and sautee for another minute or 2. Add 1 tablespoon paprika, a few dashes of oregano, and salt and pepper to taste. Pour 1, 15 oz. can tomato sauce, fill same can with chicken stock and add as well. Add black beans and 1/4 cup salsa, bring to a boil. Cut into chunks, 2 avacados and add to saucepan. Stir in 1 cup uncooked rice. Transfer all contents of saucepan to medium size casserole dish. Salt and pepper uncooked chicken tenders, place on top of rice mixture. Cover with foil and place in preheated 375 degree oven for 60 minutes. Uncover and sprinkle top with cheese. Let cook for another 5 minutes until cheese is melted and bubbly. Serve with sliced green onions, black olives and sourcream on the side.
Flank Steak
Most of the time it takes for this is the marinade. For the flank steak, set inside a large ziplock bag. This is where it will marinade. In a medium bowl, add:
1 cup Terriyaki sauce
3 tablespoons Worchestershire sauce
2 tablespoons Dijon mustard
2 tablespoons olive oil
1 tablespoon soy sauce
1 tablespoon italian seasoning
1 pinch of crushed red pepper flakes
3 cloves garlic, rough chopped
*To make it more Asian style, you can also add sesame seeds to the marinade. They stick to the steak and toast up nicely during the broiling process.
Wisk all ingredients until fairly blended and pour into ziplock bag. Massage into the flank steak a bit and set into refrigerator for at least 3 hours, more will result in more flavor.
Take flank steak out of refrigerator 1 hour before ready to cook, to make sure it's room temperature. Remove from ziplock bag and pat dry with paper towels. Set on a broiling pan and place in broiler or preheated oven set to broil, with rack position a few inches from the broiler. Broil 5 minutes on each side for medium rare. Let sit for 5 to 10 minutes until juices redistribute. Cut against the grain into thin strips.
If you want to use marinade as dipping sauce or to pour over meat, pour contents from the ziplock bag into sauce pan and cook on stovetop at medium high temp. until bubbly and slightly thickened.
Sunday, July 1, 2007
My Story
In the Spring of 2005 we had decided to build our family. What initially started out as an exciting endeavor turned into ovulation cycles, blood tests, specialists, and miscarriages. Starting a family soon became all consuming, and my 2 hour commute and 24/7 high stress job started to take a backseat to fertility. I quit my job and began focusing all my efforts to making a baby. We had been trying for almost 2 years at that point and things were starting to get confusing and challenging and emotional. I needed an outlet; I took to writing. In addition to our big project of getting pregnant, my main hobby was cooking. So my complete domestic quest ensued and I decided to be a little snarky in my blog title “Making Babies and Making Dinner.” It turns out there would not be a lot of baby making in the years to come. More like failed attempts. In November 2006 I had my first miscarriage. I was devastated. We had tried so hard and finally thought we were going to have a baby, only for a short lived pregnancy of 7 weeks to fail. More tests were performed and still all came back negative for any issues. The next step was Clomid. It made me horribly ill and after 2 months I stopped. Then there was the HSG to check for blockage. This seemed to clear the way, even though no blockage was found in my fallopian tubes. I became pregnant with Sophia at the end of July 2007 without additional treatments or fanfare. I cherished every minute of my pregnancy. I embraced even the not so fun stuff, because I had worked so hard for these moments. I decided to close down my other blog and start with a clean slate full of new hopes for our life with Sophia. “Making Babies (and making dinner when possible)” was created. After Sophia was born, we wanted to try again within the year. I had been told by my doctors that I’d probably get pregnant right away without complication. The first miscarriage was when Sophia was 6 months old. It was a brief pregnancy of 6 weeks. It was hard to experience another miscarriage, but Sophia was keeping me distracted and I was so grateful for her. After a little break, we became pregnant after Sophia’s 1st birthday. This pregnancy ended July of 2009 at 10 weeks. I found out the baby measured 8 weeks and had passed, but my body didn’t want to let go. I needed to have a D&C and they were able to perform a biopsy of the tissue. The results showed a chromosomal disorder of full Trisomy 16, which always leads to fetal death in the first trimester. This was considered a fluke and we were told to wait a few months for my body to heal, and to try again. So a few months later, we conceived again. I found out I was pregnant on Halloween, October 2009; Rick was away on his yearly hunting trip. One week later I started to bleed. Fearing yet another miscarriage, I went to my doctor for an ultrasound. The baby had implanted in my fallopian tube next to my ovary. It was an ectopic pregnancy and I needed to be injected with Methotrexate, a drug used in chemotherapy, to dissolve the pregnancy. Yet another fluke. I decided to consult with a Perinatologist after the last failed pregnancy to find out if there were other reasons all these flukes were happening. He reviewed my file, we had a brief chat about genetics and age and he told me to go home and try again, that the odds are in my favor for a healthy pregnancy the next time. By Spring of 2010 we were ready to try again. I found out in May that I was pregnant. I started to bleed shortly after, and believed either another miscarriage or ectopic was looming. Turns out that I was pregnant with twins. What is typically a shock for most people anyway, was shock and complete fear that something would again go wrong. And it did. As the result of another fluke, the twins were identical and sharing the placenta. This increased the chances of many things and I was referred to the Perinatologist for care. At 12 weeks, the level 3 ultrasound and NT scan showed an abnormal thickness in the nuchal fold, in addition to the presence of a cystic hygroma (fluid on the back neck region) in twin B. An amniocentesis was performed on each amniotic sac. The results showed that twin A was perfectly normal, where twin B had Turners Syndrome. Turners Syndrome happens when the X or Y pair is missing, resulting in an XO chromosome map. Turners Syndrome only occurs in females and 98% result in miscarriage by the 2nd trimester. There has been no reported cases of this with an identical twin pregnancy sharing the placenta, and no statistical data to give us any indication of what to expect. With both girls sharing a placenta, the death of one twin could potentially result in the death of the other. We were sent to the Fetal Care Center in Cincinnati to meet with a team of specialists that care for high risk twin pregnancy. After 2 trips out there, it was determined that the best choice was to do no intervention and to let nature take its course. Twin B, Julia Bea passed away at 26 weeks. Because of her passing, twin A, Ava Marie was in danger and was delivered at 27 ½ weeks. Ava stayed in the NICU for 2 months and came home 1 month early, a few days before Christmas 2010. She is currently doing awesome, by the way. This blog started out as a place to keep friends and family current in our struggles to create a family, hopes to post about the everyday humdrum of raising kids, and my increasingly infrequent dinner recipes. I hope if anyone else happens on a similar situation, when they search they might happen on my story and find out that they aren’t alone.
Subscribe to:
Posts (Atom)